


Hi all, Brilian here. Today I want to walk you through creating a simple but functional LLM project that you can use yourself: a career assistant. This career assistant is an LLM chatbot that will read your resume file and answer inquiries about your career. I actually use similar chatbot on my personal website, https://brilianfird.io. You can play around with it to understand its capabilities.
I'm making this article beginner-friendly and it can serve as your first project using LLM. You don't need to understand anything about LLMs for this project, although some experience with Python will be useful. Please note that we won't building any front-end in this project.
In this article, we will:
- Understand the OpenAI Chat API: This will be the only REST API we need from OpenAI. We'll experiment and learn how the API works.
- Project Design: We'll determine what we want to build and how we should build it
- Project Setup: Laying out the app's foundation before we implement the chatbot features
- Introducing the Chatbot: We'll create a simple API endpoint that can be used by front-end applications for the chatbot workflow
- (Bonus) Reducing the Cost of the Chatbot: An LLM product can be expensive, especially if it becomes popular. We'll learn basic methods to reduce costs.
Playing With the OpenAI API
We'll only need one API from OpenAI: the Chat Completions API. The OpenAI Chat Completions API is a RESTful interface that lets you generate conversational responses from large language models (like GPT-4) using a structured message format.
In the request, there will be three main things we can send:
messages: This is the message we'll send to the LLM provider.model: Themodelwill determine which model the LLM will use. We will usegpt-4.1-nanoin this project to keep costs down. But you're free to explore othermodelas well.temperature: This parameter determines how creative the LLM's response will be. Settingtemperaturehigh will make the LLM reply more creatively, but it might hallucinate more. Meanwhile, setting it low will make the LLM's response more serious and accurate.
You'll find three types of roles in the messages parameter:
system: This is the instruction that you give to OpenAI. The default isYou are a helpful assistant., but you can change it however you want. In this article, we will add your resume information and ask the LLM to act as you.user: This is the message from the user that you send to the chatbot.assistant: This is the reply from the LLM.
As an example, let's try sending some request to OpenAI's chat completion API. Remember to change the API Key:
curl https://api.openai.com/v1/chat/completions \
  -H "Authorization: Bearer YOUR_API_KEY" \
  -H "Content-Type: application/json" \
  -d '{
    "model": "gpt-4.1-nano",
    "messages": [
      {"role": "system", "content": "You are a helpful assistant."},
      {"role": "user", "content": "Hello, my name is Brilian. Nice to meet you"}
    ],
    "temperature": 0.7
  }'
You will get a response like:
...
"message": {
    "role": "assistant",
    "content": "Hello, Brilian! Nice to meet you. How can I assist you today?",
    "refusal": null,
    "annotations": []
},
...
Next, how do we continue the conversation? It's very manual—we'll need to add the previous response from OpenAI to the messages array when we send the next message.
{
    "model": "gpt-4.1-nano",
    "messages": [
        {
            "role": "system",
            "content": "You are a helpful assistant."
        },
        {
            "role": "user",
            "content": "Hello, my name is Brilian. Nice to meet you"
        },
        {
            "role": "assistant",
            "content": "Hello, Brilian! Nice to meet you. How can I assist you today?"
        },
        {
            "role": "user",
            "content": "What's my name again?"
        }
    ],
    "temperature": 0.7
}
Response:
...
"message": {
    "role": "assistant",
    "content": "Your name is Brilian.",
    "refusal": null,
    "annotations": []
},
...
This way, you can keep having a conversation with the chatbot.
Project Design
Before doing any implementation, it's a good idea to determine what we want to build and what we'll use to build it. From the product perspective, we will build an LLM that will read from a PDF file containing your career information and can answer inquiries related to it. For the UI, we will provide an API so front-end projects can access it.
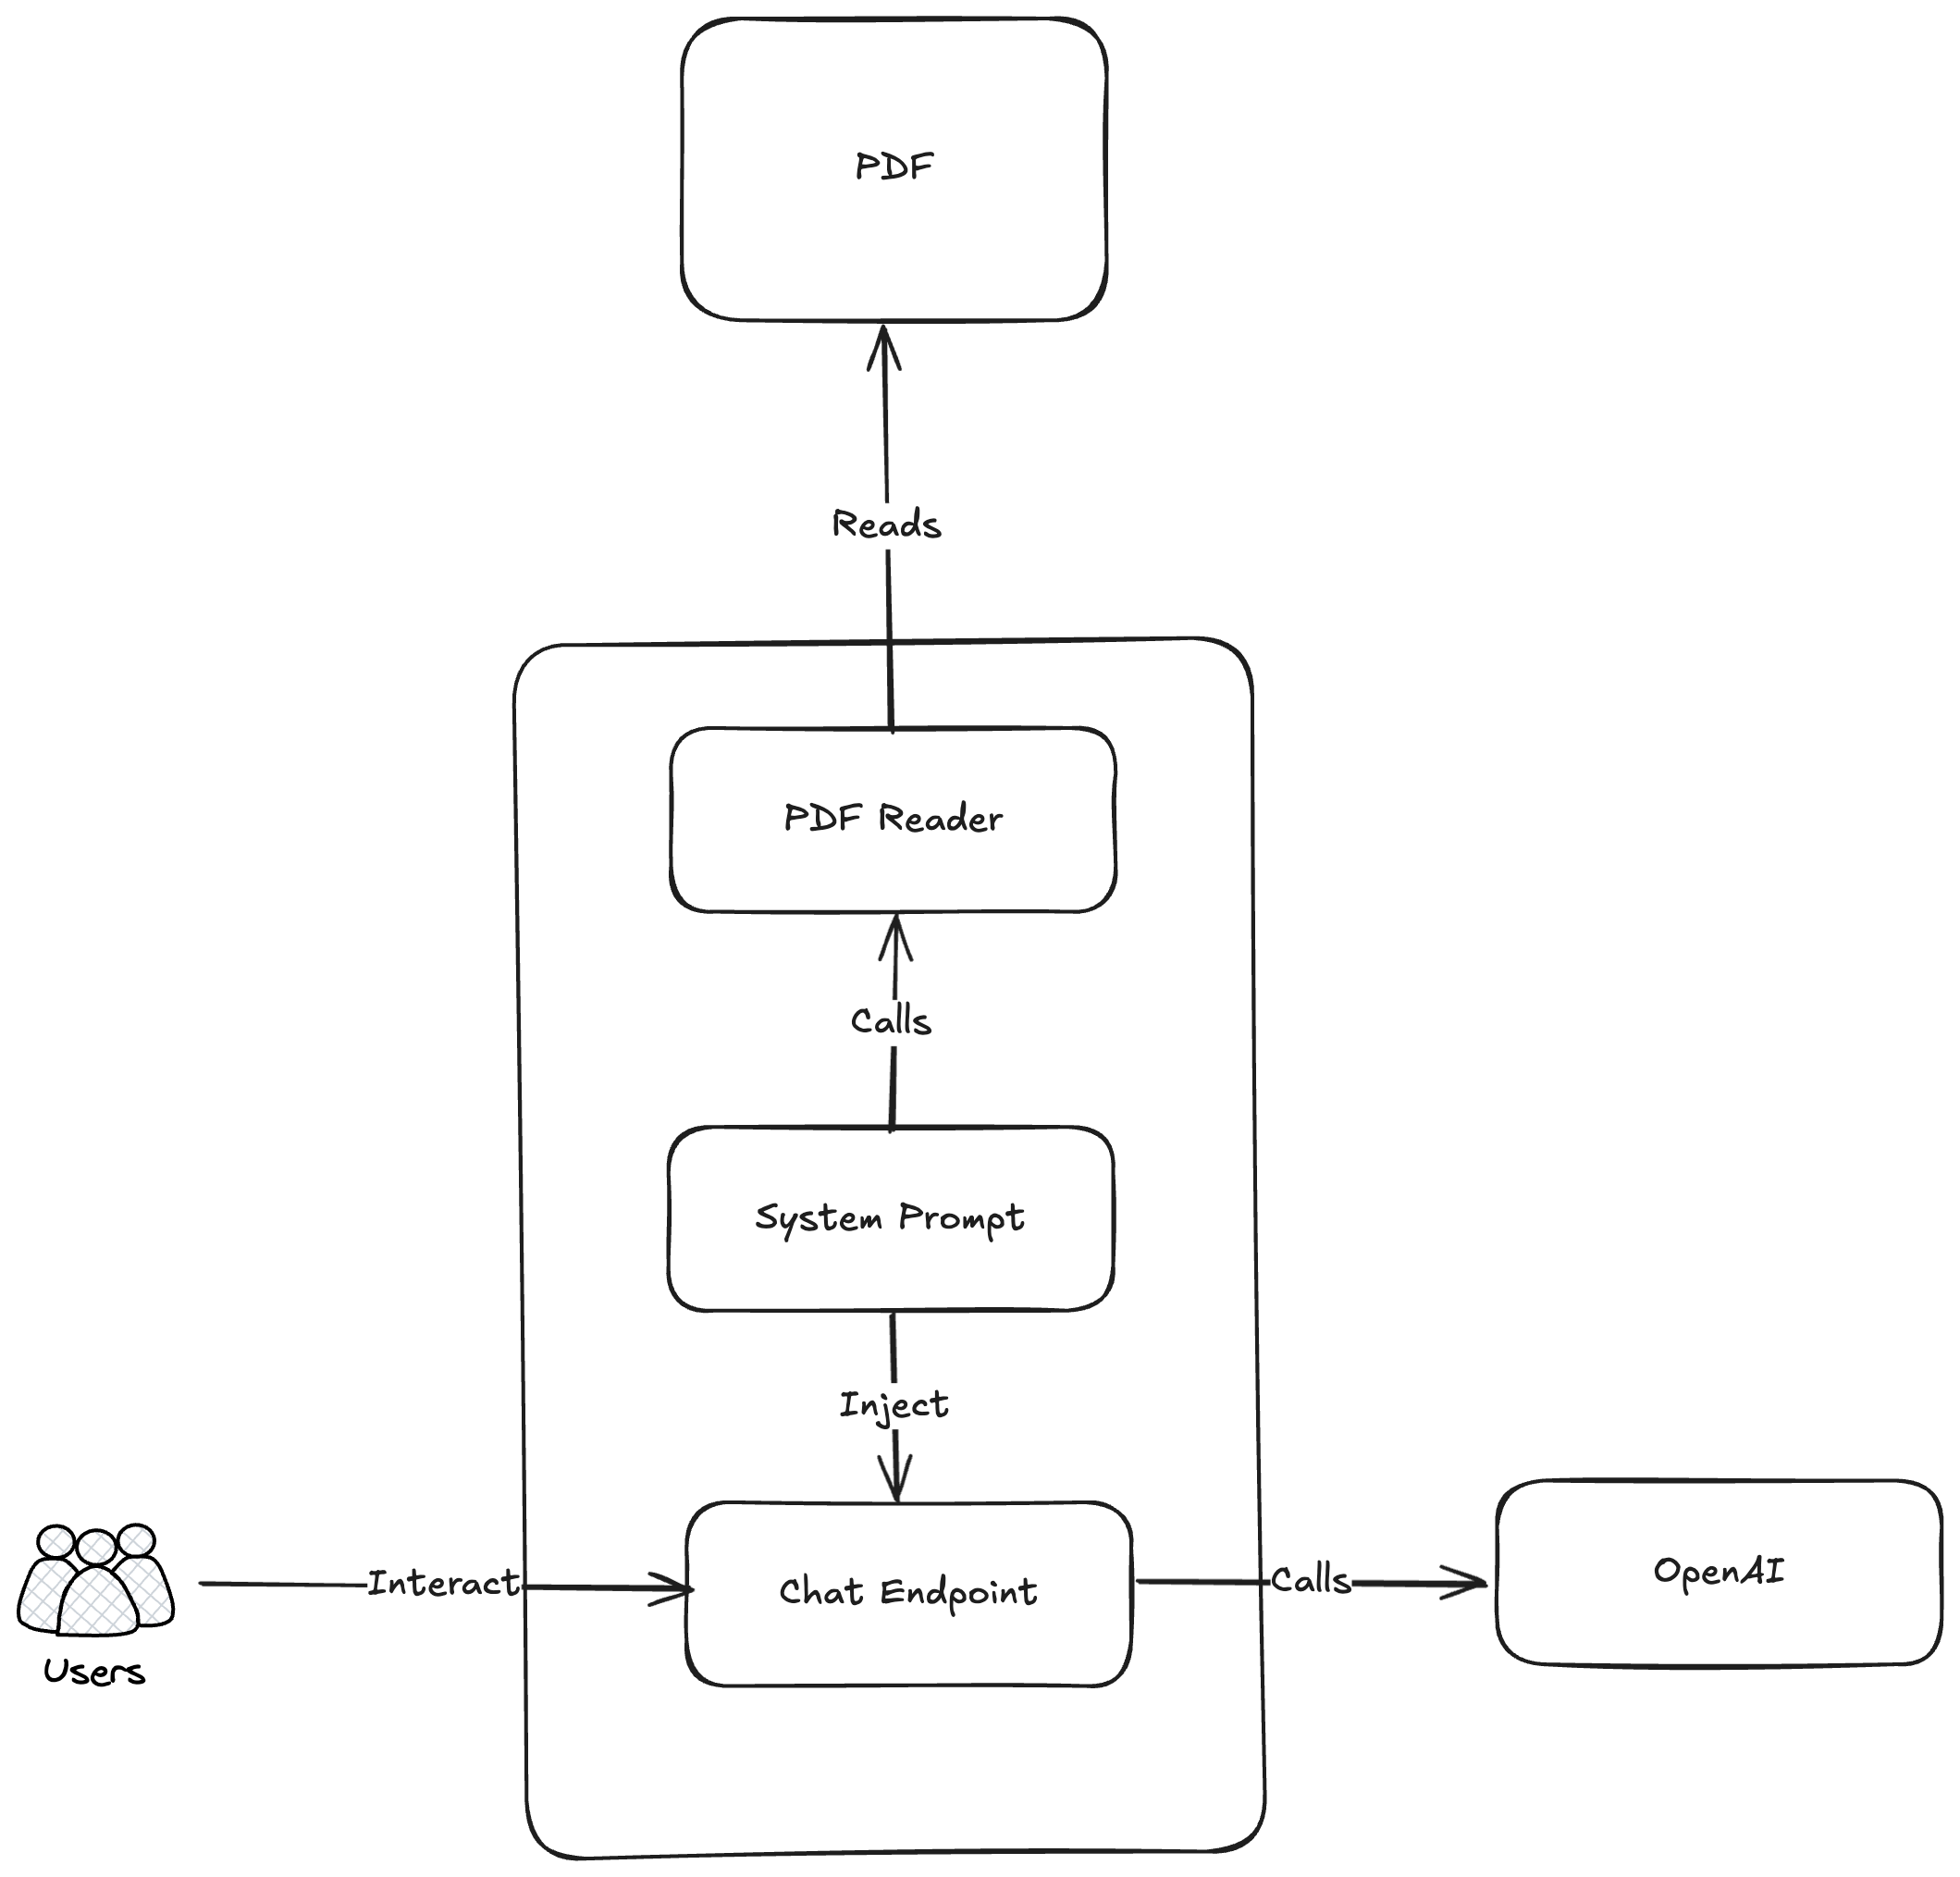
On the architecture side, we will create a method that can read a PDF file (exported from LinkedIn). We will add the text as context to the system prompt and use that system prompt to call the OpenAI endpoint.
For this project, we'll use the following tech stack:
- Python: The programming language of choice for LLM-related logic. It's simple and supports many libraries!
- uv: Dependency management for Python. If you use Python and have never used this before, I encourage you to try it. It's very lightweight dependency management for Python. If you have other preferred dependency management tools, feel free to use them.
- Uvicorn + FastAPI: Server and API Framework. We'll host a REST API endpoint to be called
- OpenAI library: This is not mandatory since we can hit OpenAI using REST API endpoints directly. But using the OpenAI library will make our job much easier!
- python-dotenv: Python library to read configuration from your environment variables. We don't want your API key to be exposed in the project!
- PyPDF2: This is a library we will use to read PDF files containing your resume information.
Initializing The Project
First, let's initialize the repository using uv. For this, we can use the following command:
uv init
After that, let's install the libraries we will use:
uv add uvicorn fastapi python-dotenv openai pypdf2
Next, create main.py and start a simple server:
import uvicorn
from fastapi import FastAPI

app = FastAPI()

@app.get("/")
def hello():
    return {"message": "Hello, world"}

if __name__ == "__main__":
    uvicorn.run(app, port=8000)
To run, use:
uv run main.py
If you open http://localhost:8000 you should see the following response:
{"message":"Hello, world"}
Great! Now we're ready to add some AI functionality to our project.
Introducing the Chatbot
Our goal here is to create a chatbot that can read your LinkedIn profile. So first, we'll need to create a function that can read from a .pdf file. PyPDF2 is a library that provides a way to read PDF files, which is suited for our use case.
import PyPDF2

def read_pdf_text(pdf_path: str) -> str:
    """Simple function to extract text from PDF"""
    try:
        with open(pdf_path, 'rb') as file:
            pdf_reader = PyPDF2.PdfReader(file)
            text = ""
            for page in pdf_reader.pages:
                text += page.extract_text() + "\n"
            return text.strip()
    except Exception as e:
        return f"Error reading PDF: {str(e)}"
Next, we'll need to create a system prompt so that OpenAI has context about what it should act as and has context about our resume. We will create a system prompt to tell OpenAI to act as you and answer career questions about yourself. We'll also add instructions so that OpenAI answers questions accurately and doesn't hallucinate. Lastly, if OpenAI doesn't have the answer, it should encourage the user to either email you or visit your LinkedIn profile.
resume_content = read_pdf_text('resume.pdf')
system_prompt = f"""
You are an AI assistant representing Brilian Firdaus, a software engineer. Your job is to answer questions about Brilian's career based ONLY on the resume information provided below.

CRITICAL RULES:
- ONLY use information explicitly stated in the resume below
- NEVER make up or invent any details about experiences, skills, projects, or dates
- Do not elaborate beyond what's written in the resume
- Do not assume or infer details not explicitly stated

CONTACT INFORMATION:
If you cannot answer a question from the resume, direct people to:
- Email: [email protected]
- LinkedIn: https://www.linkedin.com/in/brilian-firdaus/

FORMAT: Reply in plain text without markdown or special formatting.

RESUME CONTENT:
{resume_content}
"""
Now that we have the system prompt, we can create a simple API that calls OpenAI. We'll create a POST /chat API with message in its request body and call OpenAI in the API.
import os
from fastapi import HTTPException
from pydantic import BaseModel
from openai import OpenAI
from dotenv import load_dotenv

load_dotenv()

# Initialize the OpenAI client
openai_client = OpenAI(api_key=os.getenv("OPENAI_API_KEY")) if os.getenv("OPENAI_API_KEY") else None

class ChatRequest(BaseModel):
    message: str

@app.post("/chat")
def chat(request: ChatRequest):
    if not openai_client:
        raise HTTPException(status_code=400, detail="OpenAI API key not set")

    try:
        response = openai_client.chat.completions.create(
            model="gpt-4.1-nano",
            messages=[
                {"role": "system", "content": system_prompt},
                {"role": "user", "content": request.message}
            ],
            max_tokens=150
        )
        return {"response": response.choices[0].message.content}
    except Exception as e:
        raise HTTPException(status_code=500, detail=str(e))
The API is now ready. But before running, notice that we're reading the OpenAI API Key from our environment variable. You can either set the API key in your environment variable, or, because we're using python-dotenv, you can create a .env file in your main directory and place your OpenAI API Key there.
OPENAI_API_KEY=your-api-key-here
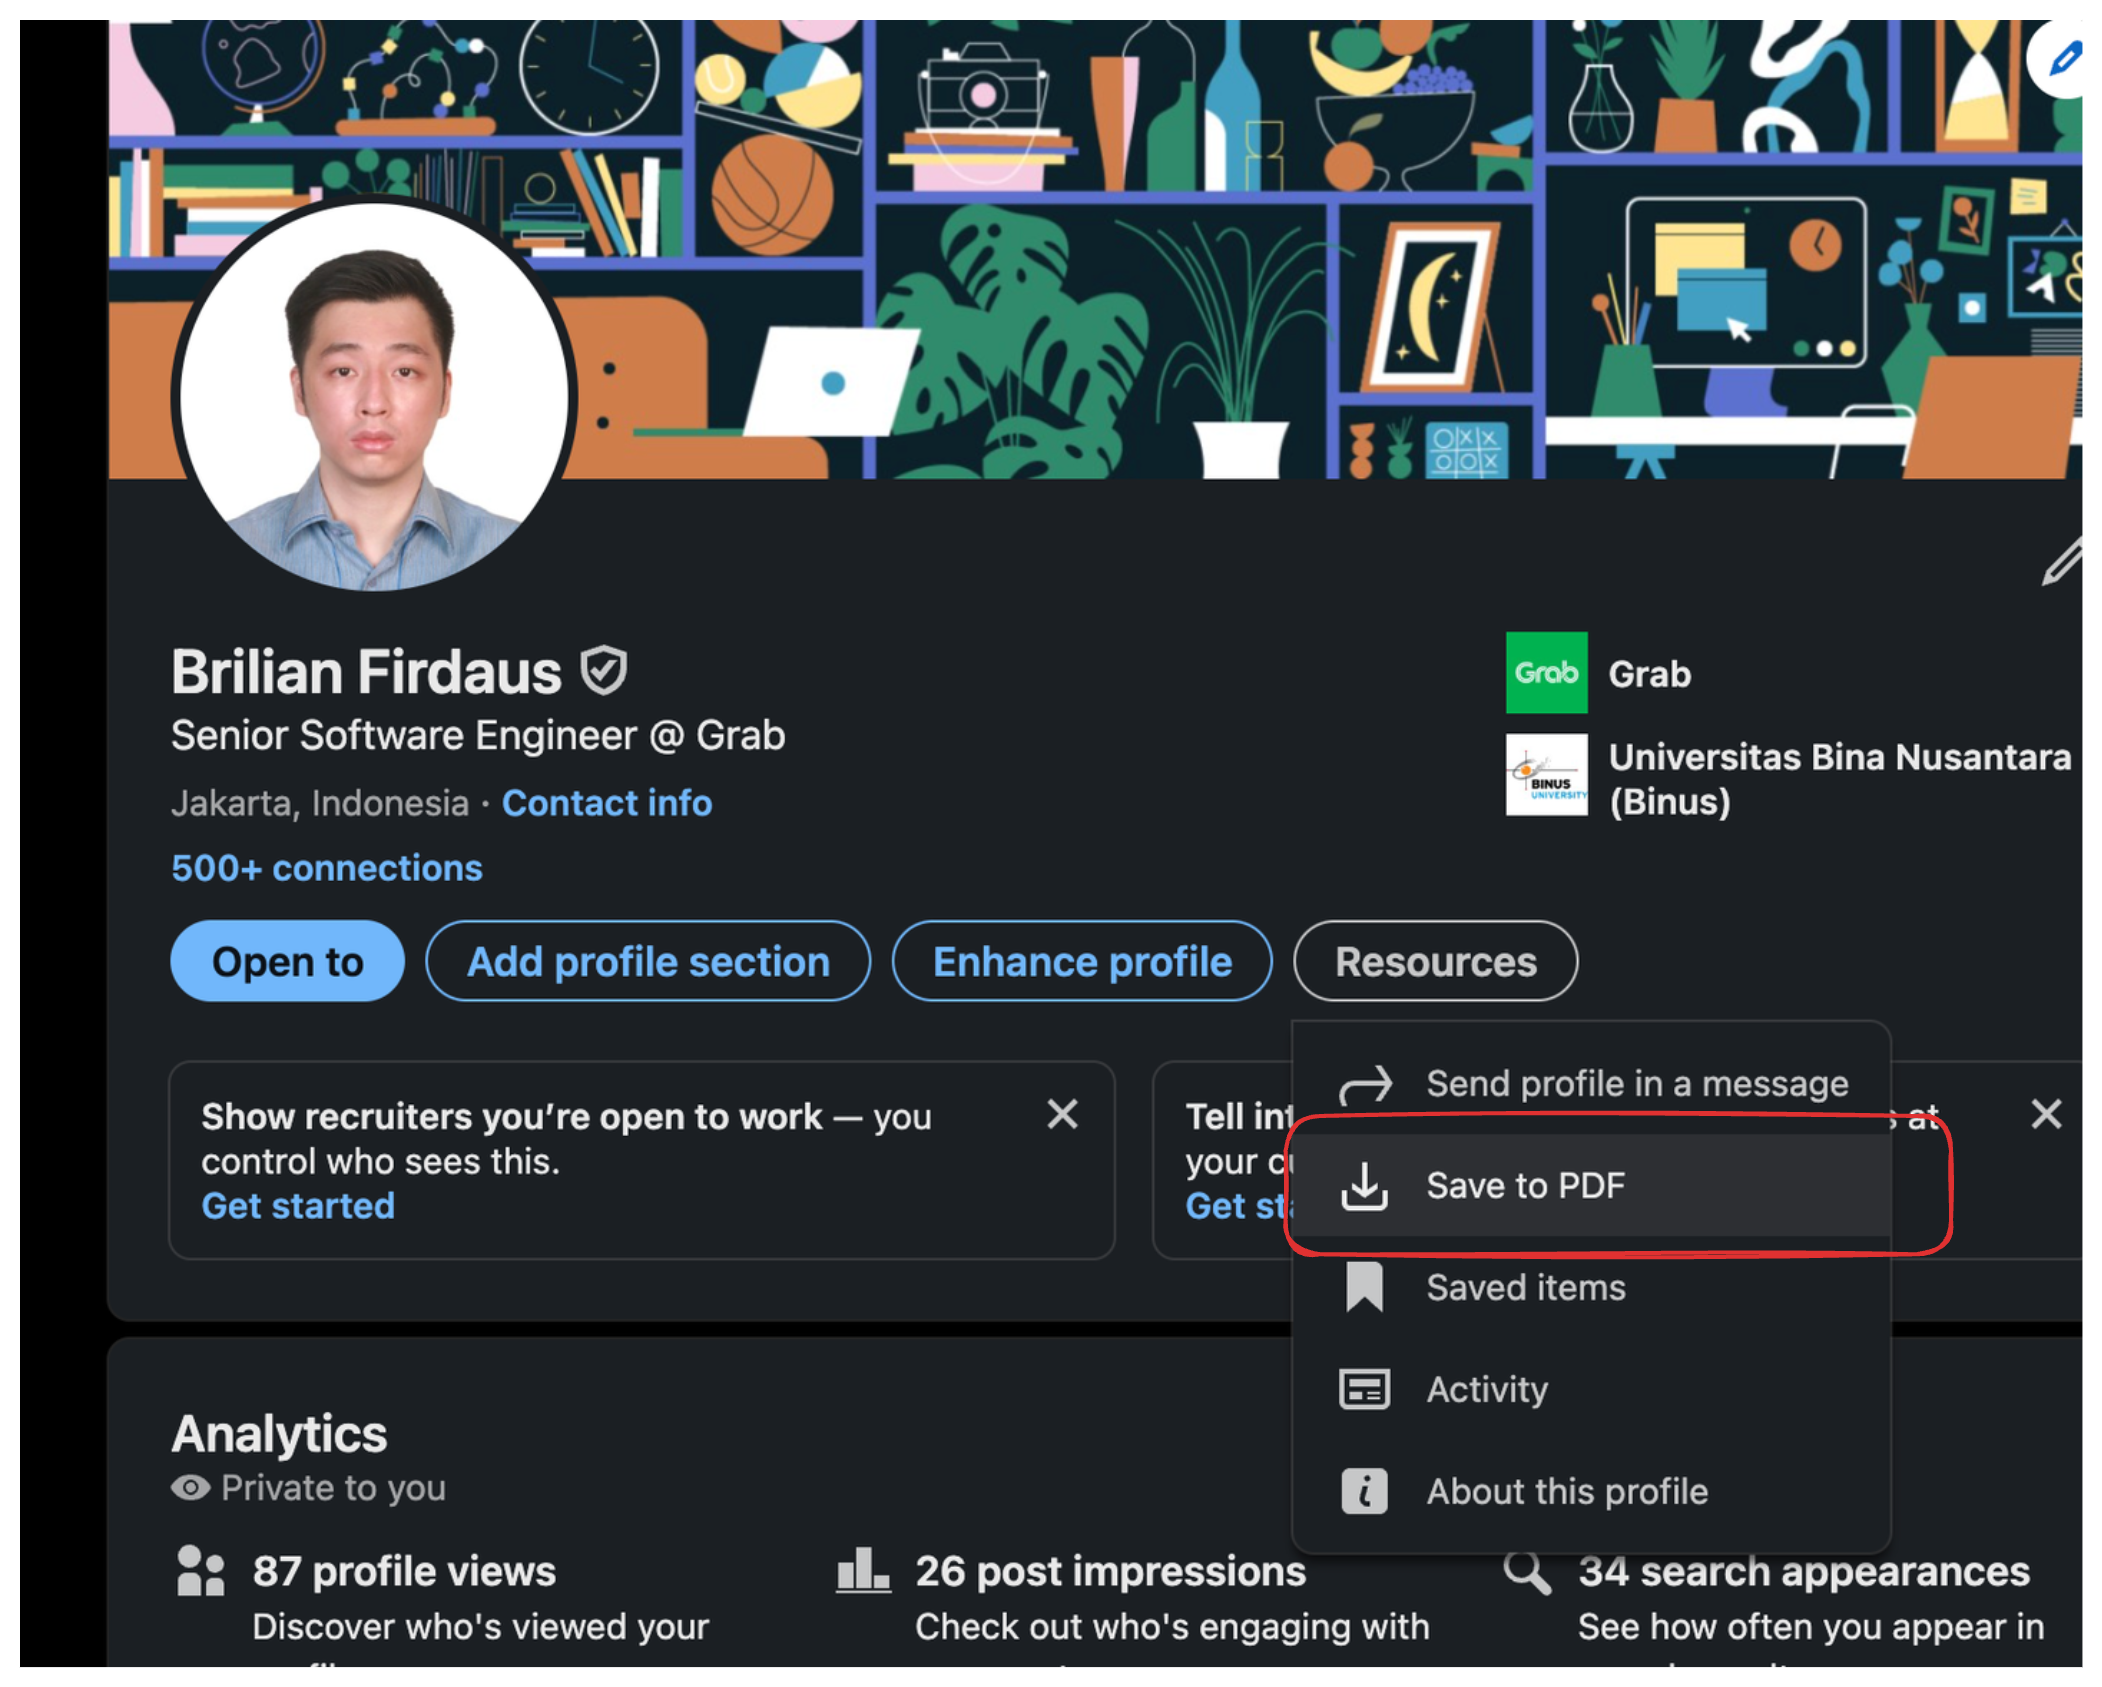
.env file to your .gitignore list.Before proceeding, remember to save your resume as resume.pdf in the root directory of the project. You can download the pdf from your LinkedIn profile.
If you've done that, let's start the project and try calling the API.
curl --request POST \
  --url http://localhost:8000/chat \
  --header 'content-type: application/json' \
  --data '{
  "message":"Introduce yourself"
}'
Results:
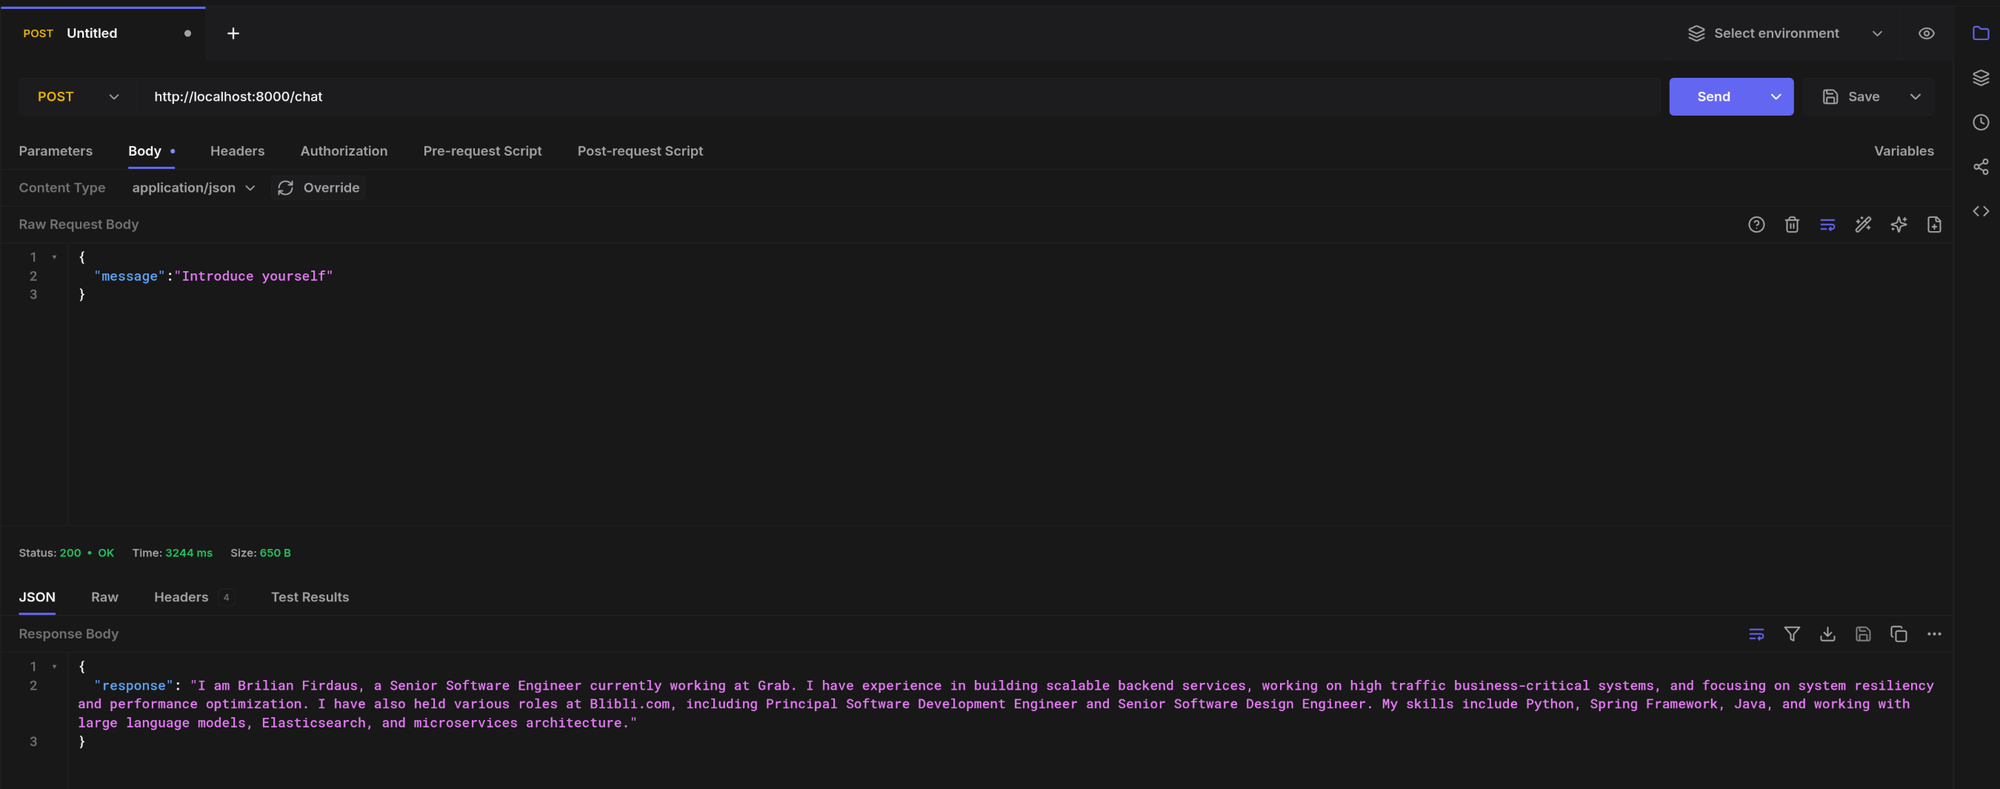
The result looks good, but we're not done just yet!
Adding Memory to the Chatbot
You might have noticed that in our bot, we sent no context from previous chat messages. To test this, you can try telling the bot a name (don't use your name because it's in the system prompt) when calling it for the first time and ask it to say the name again in the second call. This happens because the API is not sending the past conversation. For this, we have two simple options:
- We send past conversation in the API
- We create state in our system to store past conversations
Both options are easy to implement and can work well.
For this article, I will use the second option because I like my REST API to be clean! But the downside of this approach is that we're not using persistent memory, which means that past conversation history will be deleted if our app is restarted. If conversation history is important to your use case, make sure to use persistent storage instead!
To do this, we'll create a dictionary that will store a map of conversation ID to past conversations. It will look like this:
{
  "conversationId1": [
    {"role": "user", "content": "hello!"},
    {"role": "assistant", "content": "hi!"}
  ]
}
We'll also modify the API request to include conversation_id:
class ChatRequest(BaseModel):
    message: str
    conversation_id: str = None  # Make it optional
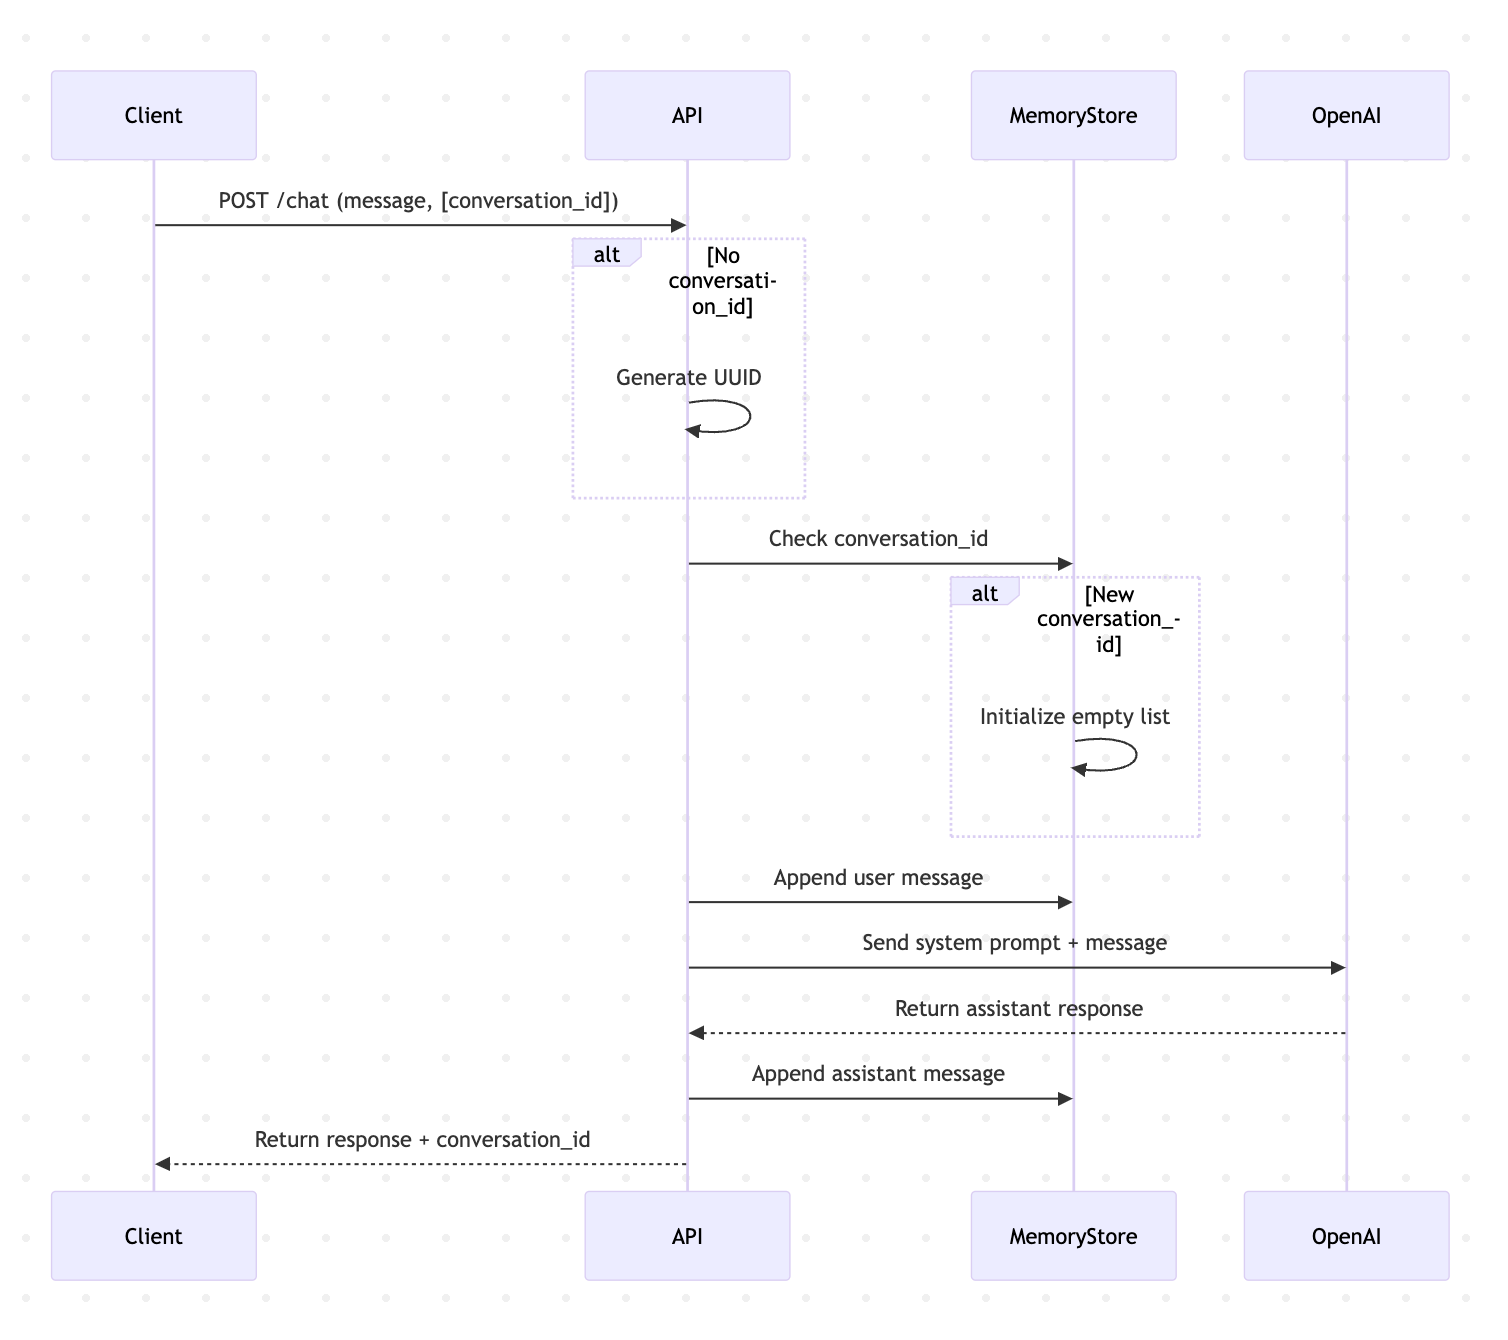
Next, in the API, we will generate a conversation_id if not provided and return it so the client can send it for the next API call. We'll also store the conversation in the dictionary and don't forget we also need to send the past conversation to OpenAI:
import uuid

# Simple in-memory storage for conversations
simple_memory = {}

@app.post("/chat")
def chat(request: ChatRequest):
    if not openai_client:
        raise HTTPException(status_code=400, detail="OpenAI API key not set")

    if not request.conversation_id:
        request.conversation_id = str(uuid.uuid4())

    if request.conversation_id not in simple_memory:
        simple_memory[request.conversation_id] = []

    simple_memory[request.conversation_id].append({"role": "user", "content": request.message})

    try:
        response = openai_client.chat.completions.create(
            model="gpt-4.1-nano",
            messages=[{"role": "system", "content": system_prompt}] + simple_memory[request.conversation_id],
            temperature=0.2,
            max_tokens=150
        )

        assistant_response = response.choices[0].message.content
        simple_memory[request.conversation_id].append({"role": "assistant", "content": assistant_response})

        return {"response": assistant_response, "conversation_id": request.conversation_id}
    except Exception as e:
        raise HTTPException(status_code=500, detail=str(e))
Let's now run the application and try hitting the API a few times. I will try to introduce myself as John in the first API call and ask for my name in the second call. Here's the conversation:
[
  {
    "role": "user",
    "content": "Hello. My name is John, nice to meet you!"
  },
  {
    "role": "assistant",
    "content": "Hello John, nice to meet you too! I am Brilian Firdaus, a software engineer. How can I assist you today?"
  },
  {
    "role": "user",
    "content": "What's my name again?"
  },
  {
    "role": "assistant",
    "content": "Your name is John."
  }
]
Looking great! Now our chatbot is complete! You can now host this bot on your personal website or wherever you'd like!
(Bonus) Keeping Costs Low
There's one thing you need to watch out for when hosting your bot in production for public use: you will spend money when people use your bot! There are several ways to reduce costs, but here are three things I recommend you do if you're concerned about expenses:
Use a Cheaper Model
Always use the cheapest model that can satisfy your requirements. In this project specifically, we're using the gpt-4.1-nano model, which is one of the cheapest OpenAI models available. You can check out this page if you're interested in exploring pricing further.
Add Max Tokens Parameter
LLM providers usually charge you per token. A token in LLMs is a unit of text—such as a word, subword, or character—that the model processes as a single input element during training and inference. You can always limit the tokens returned by the LLM to ensure it doesn't cost more than expected.
It's quite easy to do this. You only need to add max_tokens in the request to the chat completion API. On average, 1 word contains 1.5 tokens. So if you want to limit the response from the LLM to around 100 words, you can send max_tokens=150.
Rate Limiter
One of my nightmares when hosting a chatbot is when people spam the API. It's a great idea to have a rate limiter to prevent this from happening. Here's a rate limiter snippet you can copy to your project if you plan to host the chatbot publicly. First, add the slowapi dependency to your project:
uv add slowapi
Then we can initialize the rate limiter:
from slowapi import Limiter, _rate_limit_exceeded_handler
from slowapi.util import get_remote_address
from slowapi.errors import RateLimitExceeded
from fastapi import Request

# Create rate limiter
limiter = Limiter(key_func=get_remote_address)
app.state.limiter = limiter
app.add_exception_handler(RateLimitExceeded, _rate_limit_exceeded_handler)
Finally, just add it to our API:
@app.post("/chat")
@limiter.limit("20/hour")
def chat(request: Request, chat_request: ChatRequest):
    # ... rest of your code
This will limit your API to only be hit 20 times per hour per IP address. If it's hit more than that, it will return a RateLimitExceeded error.
What's Next
You've successfully built your first LLM-powered career assistant chatbot—congrats! But this is just the beginning. Here’s how you can keep going:
- Enhance Chatbot Memory: Implement persistent memory (like databases) to save conversation history, making interactions richer and more engaging.
- Optimize Costs Further: Experiment with different models and settings to balance performance and expenses effectively.
- Explore Gradio: Gradio is a Python library that makes it easy to create web-based user interfaces, especially for machine learning models. It’s popular for quickly prototyping and sharing applications like chatbots, image classifiers, and other interactive ML tools.
- Deploy to Production: Learn about best practices for securely hosting your chatbot publicly.
- Keep Learning and Stay Updated: Keep on learning LLM development, this project is only the first step. I'll continue sharing insights, tips, and advanced topics around LLM development.
If you enjoyed this guide and want more practical insights delivered to your inbox, consider subscribing to my newsletter—let's keep building together!
You can also find the complete code in this GitHub repo: https://github.com/brilianfird/career-history-assistant
